http://wiki.eclipse.org/FAQ_Where_is_the_workspace_local_history_stored%3F
Showing posts with label eclipse. Show all posts
Showing posts with label eclipse. Show all posts
Tuesday, September 30, 2014
Recover lost eclipse file
If you know the location of your workspace, and the approximate time, when the file was lost, you can get it from
\.metadata\.plugins\org.eclipse.core.resources\.history\e4
http://wiki.eclipse.org/FAQ_Where_is_the_workspace_local_history_stored%3F
http://wiki.eclipse.org/FAQ_Where_is_the_workspace_local_history_stored%3F

Tuesday, February 12, 2013
How to create java project from SVN project in eclipse
you
should right click on the project in the package explorer in eclipse and
then select to delete it without removing directory or its contents.
Next, you select to create a Java project (File -> New -> Java
Project) and in the Contents part of the New Java Project dialog box,
select 'Create project from existing source'.
The advantage this approach is that source folders will be properly identified. I found that mucking around with the .project file can lead to the entire directory being considered a source folder which is not what you want.
The advantage this approach is that source folders will be properly identified. I found that mucking around with the .project file can lead to the entire directory being considered a source folder which is not what you want.
Monday, July 9, 2012
SVN merge branch to trunk in subclipse
1.First of all make sure you are up to date. Update your working copy of the target branch, ie. where you are merging into. In this example we're working on the trunk of "core" and we want to grab the changes that have happened in the maintenance branch and merge them.
2.Resolve any conflicts. There should be no conflicts at this stage between the working copy and the repository.
3.Select the SVN merge option on the working copy. In Eclipse this is going to be found under the "Team" menu and called "Merge Branch". SVN: Merging in Eclipse
4.Change the From URL to the specific branch you want to be merged into your working copy. In this example we're looking for the p400 maintenance branch (./core/branches/p400).
5.Change the From Revision to the last revision that was merged into the target branch. Essentially you don't want to keep merging the whole branch history, you just want to include those changes since the last time you merged. There is no easy way to determine the last merge point at this time in Subversion. You have to review your message log and look for the last commit that talks about merging. If you are disciplined about the commit messages you use for merging this should be easy (see below). Make a note of what that revision is -- you'll need this later when you commit your changes. SVN: Merge with Eclipse
6.Change the To Revision to the latest (i.e. head). Make a note of what that revision is -- you'll need this later when you commit your changes.
7.Click Merge and wait. Depending on how big the differences are this may be quick or Eclipse my just fall over. If you have such an enormous change that you can't get it done in Eclipse you may need to make the range of revisions you are merging smaller. Or you may even have to skip certain revisions and do them manually if they are massive. We've had this problem from time to time when updating large third-party libraries. The vast majority of the time you will be fine.
8.Review changes and resolve conflicts. Once the merge is complete, look through the changes made to your working copy and make sure you address any conflicts you find.
9.Once all the changes have been resolved in the target working copy, check them in with a single commit. The reason you're not doing lots of commits is that these are changes that should have been documented in the branch from which you merged. The commit message needs to be in a specific format that details the merge and is easy to find in the future. We use the following format, but you can use anything that works for you -- as long as you stick to it.
courtesy : http://stackoverflow.com/questions/3611693/merging-of-branch-to-trunk-in-svn-using-eclipse
2.Resolve any conflicts. There should be no conflicts at this stage between the working copy and the repository.
3.Select the SVN merge option on the working copy. In Eclipse this is going to be found under the "Team" menu and called "Merge Branch". SVN: Merging in Eclipse
4.Change the From URL to the specific branch you want to be merged into your working copy. In this example we're looking for the p400 maintenance branch (./core/branches/p400).
5.Change the From Revision to the last revision that was merged into the target branch. Essentially you don't want to keep merging the whole branch history, you just want to include those changes since the last time you merged. There is no easy way to determine the last merge point at this time in Subversion. You have to review your message log and look for the last commit that talks about merging. If you are disciplined about the commit messages you use for merging this should be easy (see below). Make a note of what that revision is -- you'll need this later when you commit your changes. SVN: Merge with Eclipse
6.Change the To Revision to the latest (i.e. head). Make a note of what that revision is -- you'll need this later when you commit your changes.
7.Click Merge and wait. Depending on how big the differences are this may be quick or Eclipse my just fall over. If you have such an enormous change that you can't get it done in Eclipse you may need to make the range of revisions you are merging smaller. Or you may even have to skip certain revisions and do them manually if they are massive. We've had this problem from time to time when updating large third-party libraries. The vast majority of the time you will be fine.
8.Review changes and resolve conflicts. Once the merge is complete, look through the changes made to your working copy and make sure you address any conflicts you find.
9.Once all the changes have been resolved in the target working copy, check them in with a single commit. The reason you're not doing lots of commits is that these are changes that should have been documented in the branch from which you merged. The commit message needs to be in a specific format that details the merge and is easy to find in the future. We use the following format, but you can use anything that works for you -- as long as you stick to it.
courtesy : http://stackoverflow.com/questions/3611693/merging-of-branch-to-trunk-in-svn-using-eclipse
Thursday, March 18, 2010
Change End of Line characters in eclipse
In Eclipse, go to window -> preferences -> workspace
In the bottom right handside of workspace, you will see,
New Text File Line Delimiter,
Click on other, and change it to Unix.
See Image below.
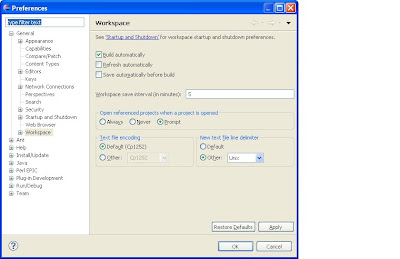
Cheers,
Sonu
In the bottom right handside of workspace, you will see,
New Text File Line Delimiter,
Click on other, and change it to Unix.
See Image below.

Cheers,
Sonu
Friday, January 29, 2010
Eclipse VM Args
Multiple VM args can be entered to eclipse by separating them with a space. See the picture below :

2) Issue : Eclipse doesnot allow spaces in vm arguments.
You can force eclipse to take a space by wrapping the value of your argument in double quotes.
-Dpropsfile="H:/user data/eclipse/workspace/wires/etc/dev.config.props"
Cheers,
Sonu

2) Issue : Eclipse doesnot allow spaces in vm arguments.
You can force eclipse to take a space by wrapping the value of your argument in double quotes.
-Dpropsfile="H:/user data/eclipse/workspace/wires/etc/dev.config.props"
Cheers,
Sonu
Friday, January 15, 2010
Friday, June 13, 2008
Increase virtual memory in eclipse
Increasing JVM's virtual memory to avoid core dumps or Out of Memory Error.
1) rt click on ur eclipse.exe or on the shortcut on ur desktop
2) goto shortcut tab and in target specify the jvm vmargs parameter as Xms and Xmx properties.
C:\Suneetha\Dwnld\eclipse\eclipse.exe -product com.genuitec.myeclipse.product.ide -vmargs -Duser.language=en -Xms256M -Xmx512M -XX:PermSize=128M -XX:MaxPermSize=256M
--Sunny
1) rt click on ur eclipse.exe or on the shortcut on ur desktop
2) goto shortcut tab and in target specify the jvm vmargs parameter as Xms and Xmx properties.
C:\Suneetha\Dwnld\eclipse\eclipse.exe -product com.genuitec.myeclipse.product.ide -vmargs -Duser.language=en -Xms256M -Xmx512M -XX:PermSize=128M -XX:MaxPermSize=256M
--Sunny
Sunday, January 13, 2008
Build using new workspace
Ear built from the new workspace when deployed on the server doesnt seem to be working.. particularly on a single pg where it calls the external service. Reason being the JRE I am using in the new the workspace is not consitent with the JRE of the server on which EAR is being deployed to.. so what did is try to change ur pref vars in ur eclipse used to build..?
Change it every where reqd.
In ur eclipse windows --> Preferences--> Buildpath --> Class Variables
JAVA_HOME c:\bea92\jrockit90_150_06
JRE_LIB c:\bea92\jrockit90_150_06\jre\lib\rt.jar
JRE_SRC c:\bea92\...\src.zip
In window prefs installed JRE's
c:\bea92\jrockit90_150_06
Use it as ur default JRE for this workspace
Ant Runtime:
global entries: c:\bea92\jrockit .... \lib\tools.jar
Change it every where reqd.
In ur eclipse windows --> Preferences--> Buildpath --> Class Variables
JAVA_HOME c:\bea92\jrockit90_150_06
JRE_LIB c:\bea92\jrockit90_150_06\jre\lib\rt.jar
JRE_SRC c:\bea92\...\src.zip
In window prefs installed JRE's
c:\bea92\jrockit90_150_06
Use it as ur default JRE for this workspace
Ant Runtime:
global entries: c:\bea92\jrockit .... \lib\tools.jar
Thursday, October 11, 2007
Eclipse Java Home set up
While compiling the new project you'll have to set up class path variables,
You do so by rt click on the project --> properties
here is the screen shot

You do so by rt click on the project --> properties
here is the screen shot

Setting up Eclipse workspace
1) SVN checkout to the folder..
2) step 1 will create all the reqd folders for your project
3) EX: if its an Enterprise proj, will create app, app-ejb, app-web
4) In your eclipse switch to the new workspace point to the directory just created
5) Create a new project in Eclipse (If its an enterprise proj, select enterprise project or just select java project)
6) Enterprise project will ask you to create 3 folders, appname, appejb and appweb
7) Name these projects same as the folders checked out from svn, (doing so will import all ur files and folder structures from the directory)
Setting Class path:
Rt click on the webproject and properties, in the build path and libraries, copy all the jar's from your webroot/web-inf/lib to here.
Also copy JRE jars from the apt location, usually from the server (so that ur server and ur eclipse use the same version of java)
In source tab make sure you have the project--> Src directory there. Or you will see complation errors (in eclipse) for all import stmts in ur java files
Some screen shots:


Create a folder in ur local machine, where you want to set up the workspace
2) step 1 will create all the reqd folders for your project
3) EX: if its an Enterprise proj, will create app, app-ejb, app-web
4) In your eclipse switch to the new workspace point to the directory just created
5) Create a new project in Eclipse (If its an enterprise proj, select enterprise project or just select java project)
6) Enterprise project will ask you to create 3 folders, appname, appejb and appweb
7) Name these projects same as the folders checked out from svn, (doing so will import all ur files and folder structures from the directory)
Setting Class path:
Rt click on the webproject and properties, in the build path and libraries, copy all the jar's from your webroot/web-inf/lib to here.
Also copy JRE jars from the apt location, usually from the server (so that ur server and ur eclipse use the same version of java)
In source tab make sure you have the project--> Src directory there. Or you will see complation errors (in eclipse) for all import stmts in ur java files
Some screen shots:


Create a folder in ur local machine, where you want to set up the workspace
Wednesday, October 10, 2007
eclipse filter on error window
Filter is found as an small iconon the error window
Click on the icon and
unchcek the defualt check box
1) Set the radio button to On selected elements and its childern
Uncheck the following
1) JSF config problems
2) JSP schematic problems
3) Validation message
4) XML schema problems
doing so will reduce errors in ur eclipse error window :)
Click on the icon and
unchcek the defualt check box
1) Set the radio button to On selected elements and its childern
Uncheck the following
1) JSF config problems
2) JSP schematic problems
3) Validation message
4) XML schema problems
doing so will reduce errors in ur eclipse error window :)
Subscribe to:
Posts (Atom)
